You will see specifically how data between a “provider” and a “user” is shared based on the installation and configuration defined in the IDS testbed (version 1.0, commit 502279a). For a detailed explanation of the individual components of the infrastructure, please refer to the official Reference Architecture Model.
Deployment: CA / Certificate Authority
One of the fundamental preconditions in the architecture designed by IDSA is that there must be an authority that issues certificates for the various participants. The IDS testbed already contains a CA for this purpose. There are also some default certificates, but they must be converted to .cert. On your server used for the tests you then perform:
git clone https://github.com/International-Data-Spaces-Association/IDS-testbed/
cd IDS-testbed/CertificateAuthority/data/cert
# .crt + .key -> .p12openssl pkcs12 -export -out testbed1.p12 -inkey testbed1.key -in testbed1.crt -passout pass:password
# .p12 -> .cert
openssl pkcs12 -in testbed1.p12 -out testbed1.cert -nokeys -nodes -passin pass:password
DAPS / Dynamic Attribute Provisioning Service
DAPS is a component that dynamically monitors the reliability of participants (unlike certificates, which are static). Being a dynamic component, it will serve to run it on a separate server. Here is to launch it with Docker:
git clone https://github.com/International-Data-Spaces-Association/IDS-testbed/
cd IDS-testbed/OmejdnDAPS
docker run -d --name omejdn -p 4567:4567 -v ./config:/opt/config -v ./keys:/opt/keys daps
The DAPS needs to know the certificates of the entities in the data space. The DAPS available in the IDS testbed is already configured to accept the default certificates, but if you want to add new ones, you need to follow the procedure below and restart the DAPS:
chmod +x extensions.sh./extensions.sh> Input your certificate filename:testbed1.cert> The aki/ski extension for testbed1.cert is:66:07:ED:E5:80:E4:29:6D:1E:DD:F7:43:CA:0E:EB:38:32:C8:3A:43:keyid:07:FC:95:17:C4:95:B9:E4:AD:09:5F:07:1E:D2:20:75:2D:89:66:85nano config/clients.yml# E aggiungere questo elemento, usando come client_id quello trovato prima e come certfile il nome del file con il certificato:- client_id: 66:07:ED:E5:80:E4:29:6D:1E:DD:F7:43:CA:0E:EB:38:32:C8:3A:43:keyid:07:FC:95:17:C4:95:B9:E4:AD:09:5F:07:1E:D2:20:75:2D:89:66:85
 name: Nome client di esempio
 allowed_scopes:
   - openid
   - profile
   - omejdn:api
   - omejdn:write
   - idsc:IDS_CONNECTOR_ATTRIBUTES_ALL
   redirect_uri: http://localhost:4200
   attributes:
   - key: securityProfile
   value: idsc:BASE_SECURITY_PROFILE
   - key: referringConnector
   value: http://testbed1.demo
   - key: "@type"
   value: ids:DatPayload
   - key: "@context"
   value: https://w3id.org/idsa/contexts/context.jsonld
   - key: transportCertsSha256
   value: c68d9e6ba3f1799bcbe5bec9d7d98b15b0ef2f292c80f6bca994178aa95ae10d certfile: testbed1.cert
Connector
Each of the participants who want to share data needs a connector, which regulates the exchange of data and defines the policies to be followed.
Before launching your connector, you must compile the Docker image with the “hard-coded” configuration of the DAPS: once the repository has been cloned, it will be necessary to modify the src/main/resources/application.properties file in the connector. A folder and specify the DAPS address (daps.url and daps.token.url properties). If the data space is tested, we can disable SSL; otherwise, it is preferable to enable it and upload a certificate to the folder indicated in server.ssl.key-store.
Once the changes are made, you compile with Docker build -t dsc . and then you launch the connector with Docker Compose:
version: '3.5'services:
 postgres:
   image: postgres:13
   container_name: postgres
   ports:
     - 5432:5432
   env_file:
     - postgres.env
   volumes:
     - dataspaceconnector-data:/var/lib/postgresql/data
   restart: alwaysdataspaceconnector:
 image: dsc
 container_name: dataspaceconnector
 ports:
   - 8080:8080
 env_file:
   - dataspaceconnector.env
 volumes:
   - ~/IDS-testbed/DataspaceConnectorA/src/main/resources/conf:/conf
 depends_on:
   - postgres
 restart: alwaysui:
 image: ghcr.io/international-data-spaces-association/dataspace-connector-ui:9.0.0
 container_name: ui
 ports:
   - 8083:8083
 env_file:
   - ui.env
 depends_on:
   - dataspaceconnector
 restart: alwaysvolumes:
 dataspaceconnector-data: {}
With the following configuration files:
# dataspaceconnector.env
SPRING_SECURITY_USER_NAME=admin
SPRING_SECURITY_USER_PASSWORD=password
SPRING_DATASOURCE_URL=jdbc:postgresql://postgres:5432/connectordb
SPRING_DATASOURCE_USERNAME=connector
SPRING_DATASOURCE_PASSWORD=12345SPRING_DATASOURCE_PLATFORM=postgres
SPRING_DATASOURCE_DRIVERCLASSNAME=org.postgresql.Driver
SPRING_JPA_DATABASEPLATFORM=org.hibernate.dialect.PostgreSQLDialect
SERVER_SSL_ENABLED=trueSERVER_SSL_KEY-STORE=/conf/idsa-provider.jwlss.pw.p12
SERVER_SSL_KEY-STORE-PASSWORD=password
SERVER_SSL_KEY-ALIAS=1
CONFIGURATION_PATH=/conf/config.json
CAMEL_TRUSTSTORE_PATH=/conf/truststore.p12
PORTAINER_APPLICATION_HOST=portainer
PORTAINER_APPLICATION_PORT=9000
PORTAINER_APPLICATION_USERNAME=admin
PORTAINER_APPLICATION_PASSWORD=password.
# postgres.env
POSTGRES_USER=connector
POSTGRES_PASSWORD=12345
POSTGRES_DB=connectordb
# ui.env
CONNECTOR_URL=https://172.16.2.3:8080
CONNECTOR_USER=admin
CONNECTOR_PASSWORD=password
UI_TITLE=Dataspace Connector UI
Utilization
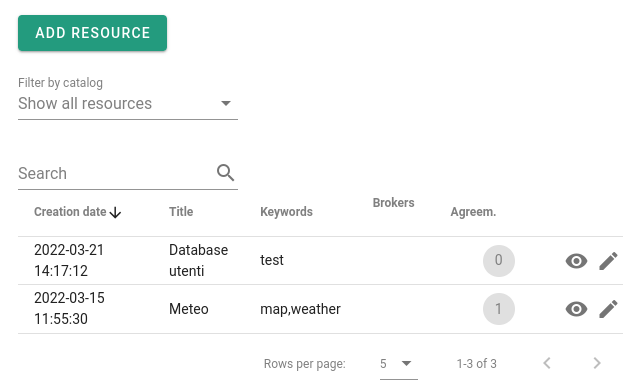
Now let’s imagine a basic scenario with a provider and a user. On the provider side you try to expose a file called database.txt in the data space. The connector of the provider has to be connected to port 8083 and here select:
Data Offering > IDS Resources > Add resource
The screens that are presented to you are:
- Metadata: some human-readable data on the resource; in particular, the “standard license” will be the one that will regulate the exchange at the contractual level.
- Policy: the data access policy, among those standards defined by IDSA, the connector will have to apply.
- Catalogs: local catalogs that group resources.
- Brokers: Here you can register the asset with one or more external brokers.
Once the resource has been created, you will be redirected to the screen with the resources offered. Initially in the “agreements” column you will see 0, which means that no contract of use has yet been signed for this resource.
Now try to access the resource from the other connector – of the user. From the web interface you go to Data Consumption > IDS Resources > Request Resource. Here you enter the URL of the connector (Attention: it must be the IDS-HTTP endpoint, for example https://idsa-provider.jwlss.pw:8080/api/ids/data) and select the resource. At this point you will see the established contract of the provider (in point 1, Metadata) and you will have the possibility to accept it or not. If you accept, an agreement will be created, and you gain access to the “representation”, that is, a URL that points to the resource to which you will access through the connector.
Here you have seen how to create a minimum data space and how to use it to exchange resources. Thanks to the principle of interoperability (at the heart of initiatives such as GAIA-X) you will be able in the future to extend this network in a simple way, installing a connector for each participant and offering a series of federation services encoded in the IDS architecture.
To learn more about this topic, please consult the IDSA Reference Architecture Model and the implementations of the main connectors, Eclipse and the IDS Reference Connector. For any comments or suggestions on this guide we also invite you to contact us.
This article was written by Giulio Muscarello an open source developer with a passion for administering Linux systems and Kubernetes clusters and Christian is Senior Engineer and Program Manager for the TOP-IX Consortium.


